
meta data for this page
Notes on PaleoGIS
- The public manual for version 4.2 can be found on Rothwell's Google Docs page
- The manual for the plate modeler
 is located here and describes the steps to get a model set up.
Setting up a clean database
Building a PaleoGIS model without a PaleoGIS license, access to MS Access and being in Windows is close to impossible. There are ways to programatically do this but almost exclusively this is limited to the settings above. Some days of researching the webs didn't yield anything useful (e.g. using Python to write the database table). The used *.mdb format makes it very hard to reverse-engineer, the inability of ArcGIS to rename the OBJECTID field in the plate rotation table is another one.
Here's my take on what I think is the most robust way to generate a working PaleoGIS model without actually having access to PaleoGIS. It leaves the last step of model building (importing the rotation file) to the PaleoGIS user with a valid license:
- Use ArcCatalogue to generate an empty Personal Geodatabase (
*.mdbformat)
- Import the feature data through right-clicking on the database file and selecting
Import→Feature Class (single)orFeature Class (multiple)depending on your input.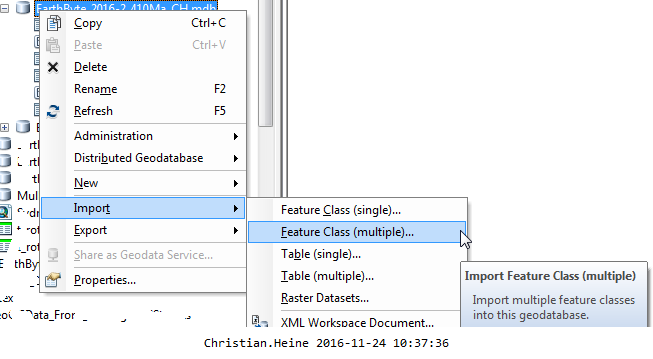
- From an existing and working PaleoGIS database, copy over the following tables by simple drag'n'drop into your new database:
T_Model_Settings(required PaleoGIS model settings table),PLATENAM(optional, referenced by theNUMBER_NAME_MAPPINGparameter in the settings table).DATATYPE(this table is required by PaleoGIS and is referenced by theDATATYPE_NAME_MAPPINGparameter), as well as- a timescale table of choice (referenced by the
TIMESCALE_SOURCEparameter).
- By dragging the
T_Model_Settingsinto an ArcMap window, and choosing 'Edit', modify the following parameters in theT_Model_Settingsin a way that the variables point to the correct feature classes or tables:TIMESCALE_PREFERRED: Value should be set to the name of the timescale table you've copied into your database.DISPLAY_LAYER_[1-9]: Value should be set to the feature class that should be displayed when the model is loaded. Increment the number at the end of the name string for any other added feature. Note that you need to use the following notation if you have simple, unstyled feature classes:$PGD$|<Your feature class name>, if you have styled layers files, the syntax becomes:$PGD$|DATABASE_LAYERS\<Your feature class name>.DATATYPE_NAME_MAPPING: This value points to theDATATYPEtable which is required to be present.TIMESCALE_SOURCE: Name of the timescale table.- Adjust the
PLATE_COLUMN,APPEARS_COLUMN_1,DISAPPEARS_COLUMN_1to the correct names of the corresponding columns in your feature class files. Following the formal GPlates Standard Naming scheme, the column names should bePLATEID1,FROMAGE, andTOAGE.
MODEL_LATITUDE_COLUMN or MODEL_REFPLATE_COLUMN unchanged as the PaleoDataConverter output will automatically use the default PaleoGIS naming scheme for these columns
Once the database is complete and the name-attribute mapping in the T_MODEL_SETTINGS table is correct, pass the database on to your friendly plate modeler with a PaleoGIS license. The steps to complete the assembly of the PaleoGIS database are then simply to:
- Open up an ArcMap document with PaleoGIS installed.
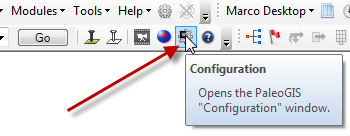
- Open up the PaleoGIS settings
- Register the new model by clicking on
Register Model, then click on the…Button next toModel Path. The settings table should be automagically be registered, as the model name (CITATIONvalue in theT_MODEL_SETTINGStable). Once done, clickOKto load the model (with the tickbox forLoad model after registeringchecked).
- Once this is done, PaleoGIS will probably have a little hissy fit, but close the
Configurationwindow. - Make sure that the toolbar is available through right clicking on the ArcMap menu bar, the activating the
PaleoGIS: Analysis Toolmenu.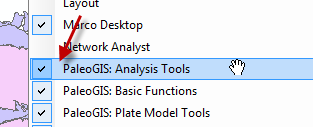
- Select the
Paleo Data Converterfrom the PaleoGIS Analysis Toolbar
- Select
Rotation File (.rot)as input data type.
- Select
Personal Geodatabase Table (.mdb)as Output format, the output location needs to be in the newly created*.mdbdatabase. Afterwards click onRun.
- Your plate model for PaleoGIS should now be complete and useable. If necessary adjust the
T_MODEL_SETTINGStable.